 Save
Save This spooky no-bake cheesecake brings together creamy strawberry filling and a classic cookie crust in an unforgettable brain shape. The dessert starts with a crunchy graham cracker base, followed by layers of fresh strawberry puree enriched with gelatin, then a rich cream cheese and whipped cream mixture blended throughout.
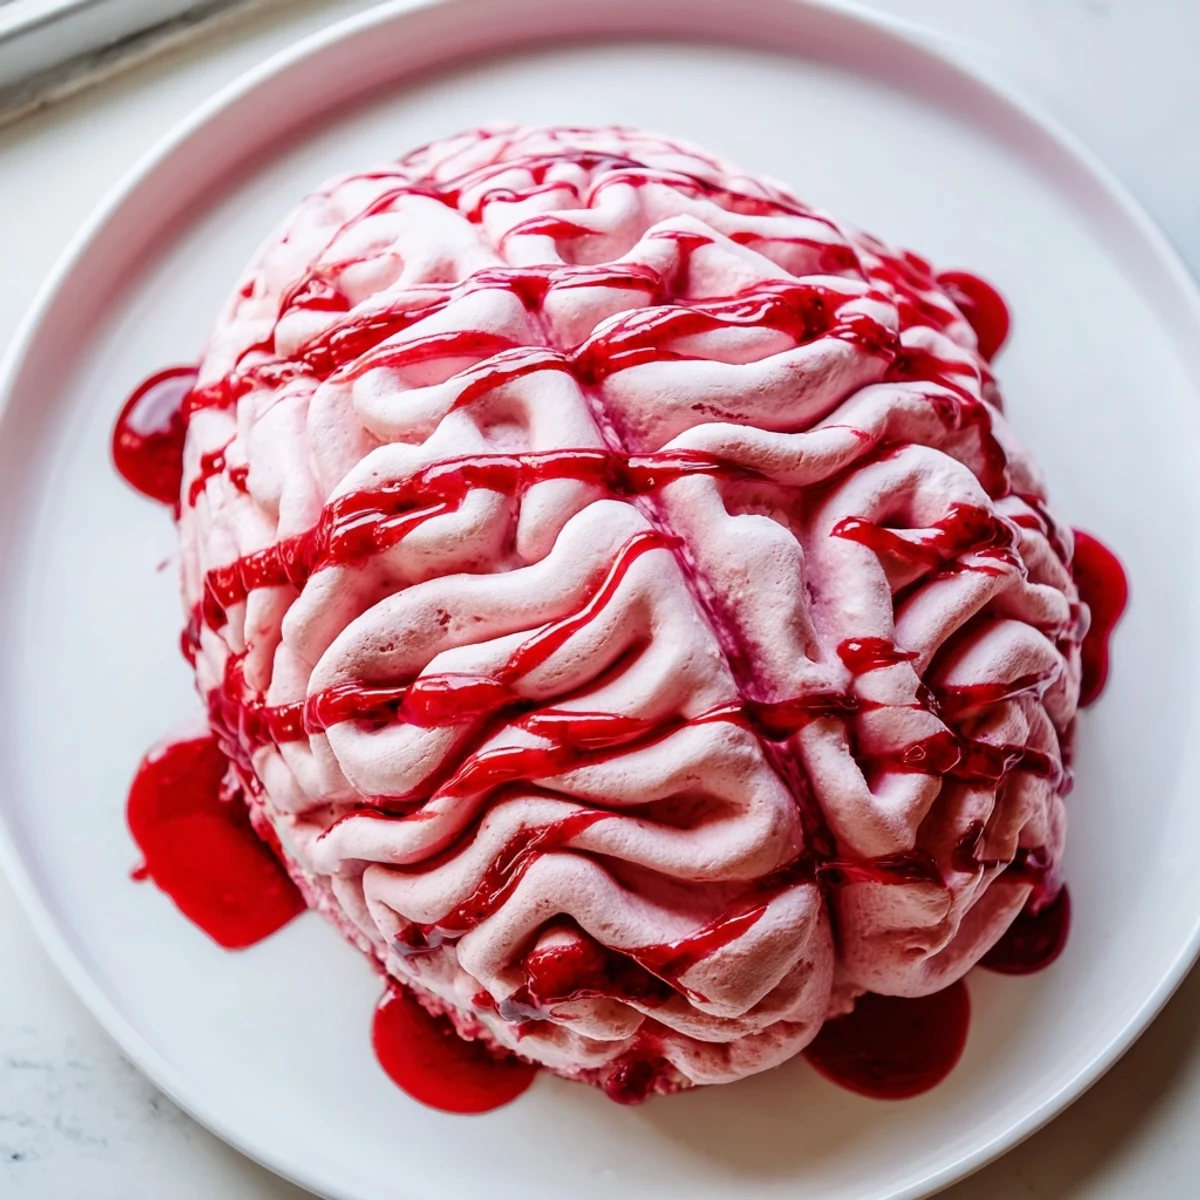
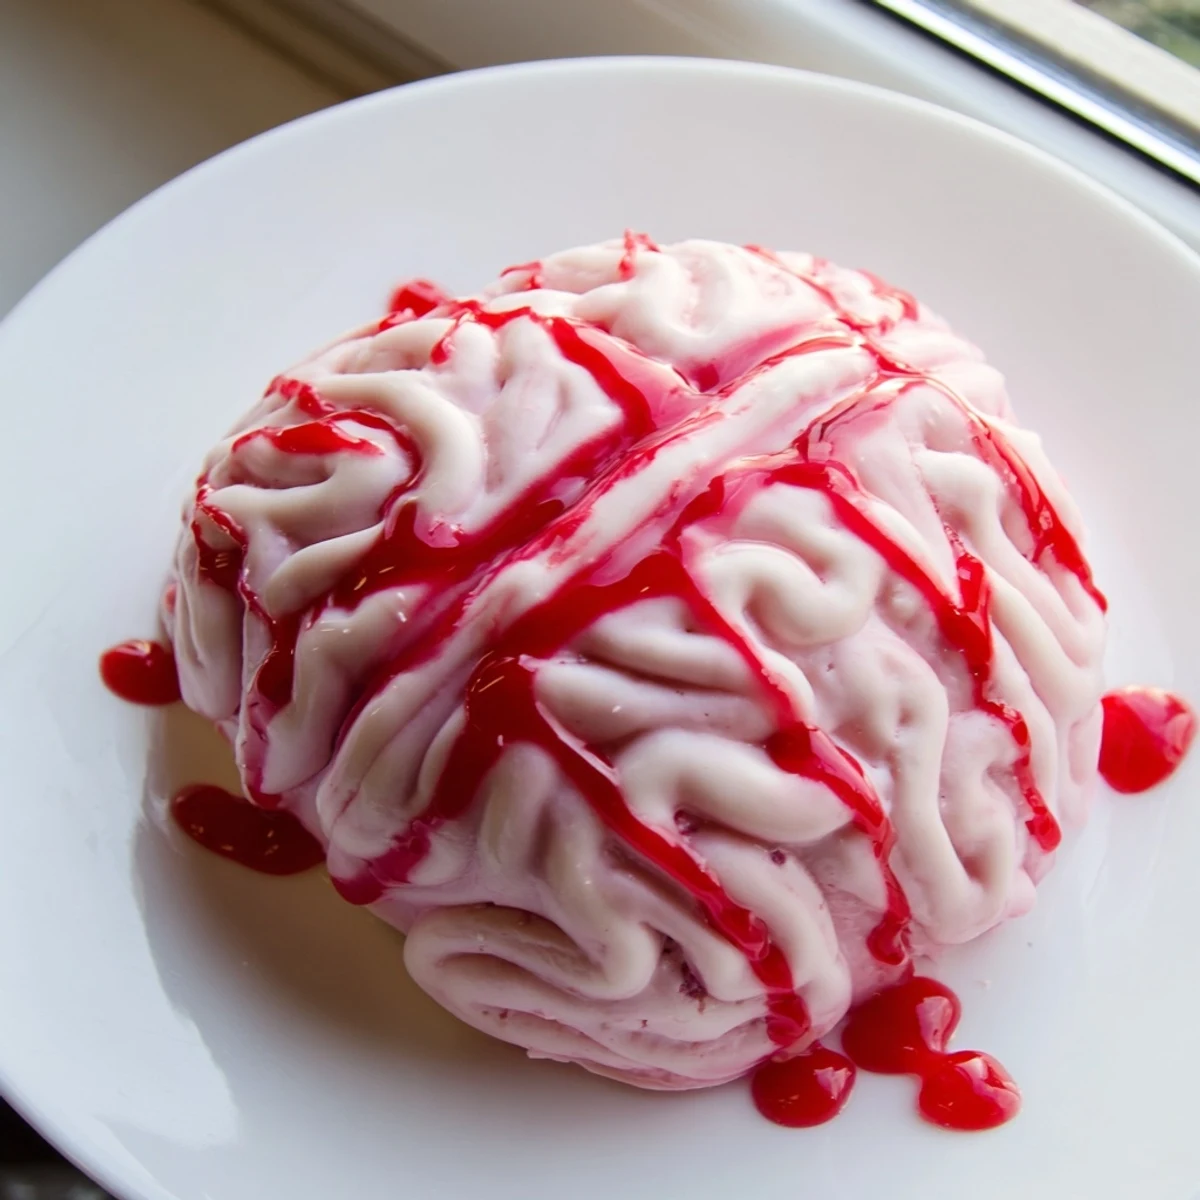
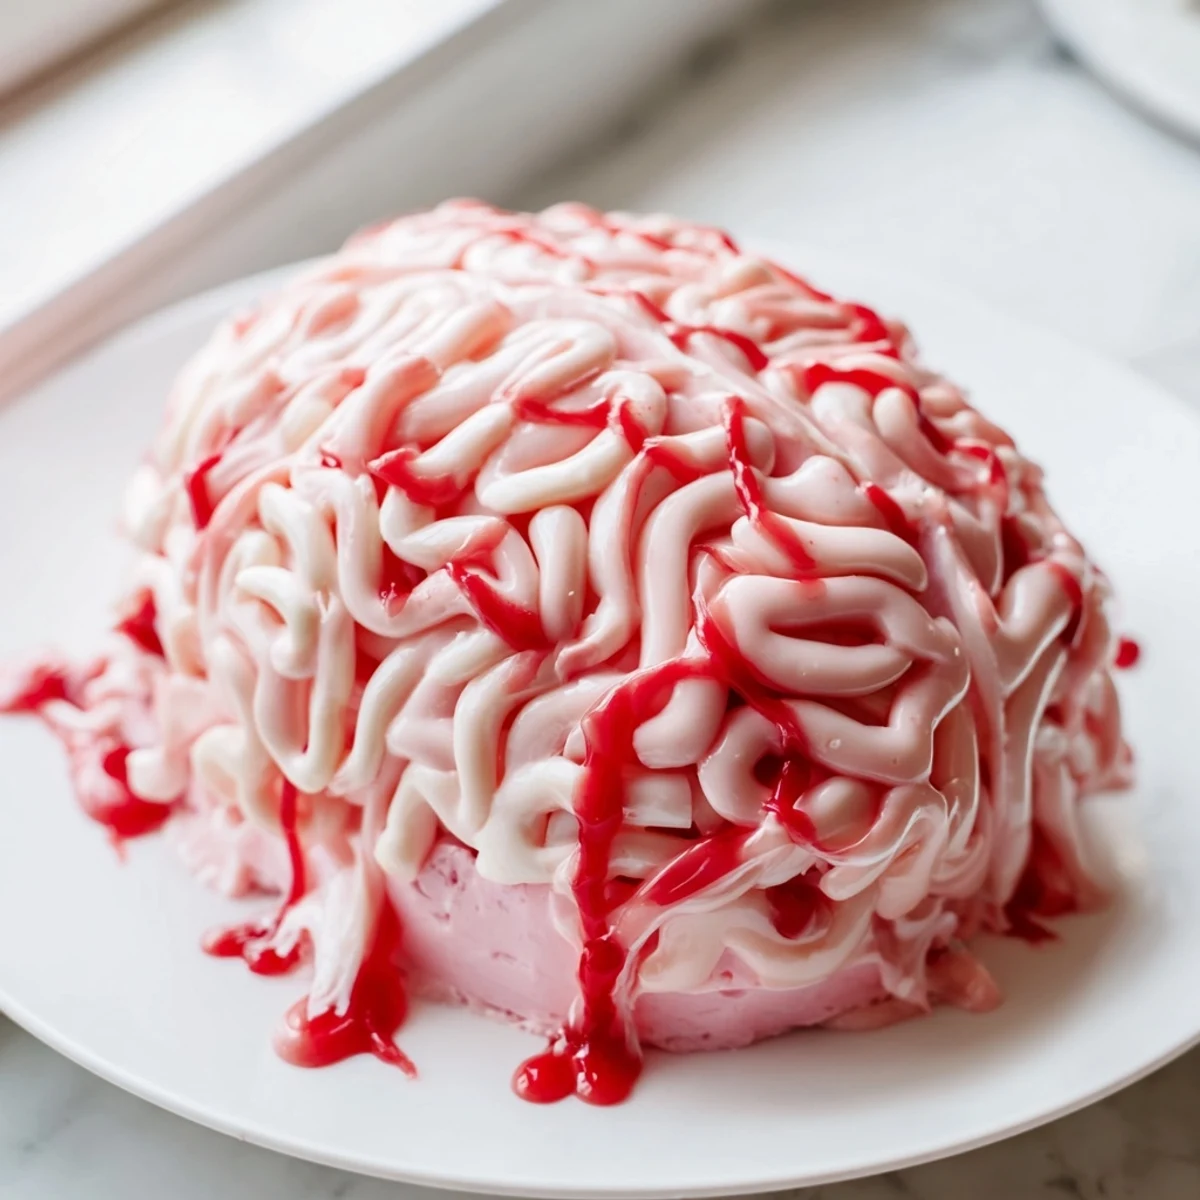
What makes this creation special is the striking presentation—molded into an anatomically-inspired brain form and decorated with white chocolate squiggles that mimic the brain's folds. A final drizzle of bright red strawberry coulis adds the perfect gory touch for Halloween celebrations.
The entire dessert requires no baking, just chilling time to set properly. It serves 10 people, making it ideal for parties. The texture is incredibly smooth and creamy, while the fresh strawberry flavor balances perfectly with the rich cream cheese base.
For customization, you can swap graham crackers for chocolate cookies to create a darker base appearance, add freeze-dried strawberry powder for intensified fruit flavor, or use agar-agar instead of gelatin to accommodate vegetarian diets.
The first time I brought this brain cheesecake to a Halloween party, I set it on the buffet table and walked away. Within ten minutes, someone rushed over looking genuinely concerned, asking if I'd accidentally left an actual anatomical model on the dessert table. That's when I knew this ridiculous dessert had accomplished exactly what I'd hoped for.
I developed this recipe after my daughter's anatomy class fundraiser needed something memorable. We tested three versions before getting the brain texture right—turns out the secret is piping the white chocolate while it's barely warm, not fully cooled. The way guests hesitantly approach it, then realize it's delicious and go back for seconds, never gets old.
Ingredients
- 200 g graham crackers: These create the classic crumbly foundation that holds everything together without overwhelming the delicate filling
- 75 g unsalted butter, melted: Room temperature butter mixes more evenly and prevents those soggy spots I used to get in my early attempts
- 400 g fresh strawberries: I've learned to pick berries that are slightly underripe for this recipe since the gelatin will balance out any tartness
- 2 tbsp granulated sugar: Just enough to draw out the strawberry juices without making the layer cloyingly sweet
- 2 tbsp water: Essential for blooming the gelatin properly—I learned the hard way that too much water makes the layer too soft
- 2 tsp gelatin powder: This is what gives the strawberry layer its structure so it doesn't sink into the cheesecake filling
- 400 g cream cheese: Make absolutely sure this is properly softened or you'll end up with tiny lumps that no amount of whipping can fix
- 100 g powdered sugar: The fine texture incorporates seamlessly without leaving any grainy texture behind
- 200 ml heavy cream: Whip this to just soft peaks—overwhipping makes the final filling too stiff and difficult to work with
- 1 tsp vanilla extract: Pure vanilla makes a noticeable difference here since the flavor profile is relatively simple
- 200 g white chocolate: Use a good quality brand here since the chocolate squiggles are what people see first
- Pink gel food coloring: Gel coloring won't thin out the melted chocolate the way liquid drops do
- Extra strawberry coulis: This is purely for that gory drizzle effect that makes the brain look freshly... well, you know
Instructions
- Prep your brain mold:
- Rub a thin layer of neutral oil inside a brain shaped silicone mold or line a medium oval bowl with plastic wrap, leaving plenty of overhang to help with removal later
- Build the crust foundation:
- Pulse the graham crackers in a food processor until they're fine crumbs, then pour in the melted butter and pulse until combined—press this mixture firmly into the bottom of your mold using the back of a spoon, then pop it in the refrigerator to set while you work on everything else
- Make the strawberry layer:
- Blend those hulled strawberries with the sugar until completely smooth, then heat your water in a small saucepan, sprinkle the gelatin over the surface and let it bloom for about five minutes before gently warming until dissolved
- Combine and cool:
- Stir the dissolved gelatin into your strawberry puree, then set this aside to cool completely to room temperature—if you add it while it's still warm, it will melt the cream cheese mixture and ruin everything
- Prepare the cheesecake base:
- Beat your softened cream cheese with the powdered sugar until it's absolutely smooth with no lumps remaining—this takes about two minutes on medium speed and is worth every second
- Add the whipped cream:
- In a separate bowl, whip that heavy cream to soft peaks that just barely hold their shape, then gently fold it into the cream cheese mixture along with the vanilla—use a spatula and fold from the bottom up to keep as much air in the mixture as possible
- Combine the fillings:
- Pour your cooled strawberry gelatin mixture into the cheesecake filling and fold together until everything is uniformly pink with no streaks remaining—work quickly since that gelatin will start setting up
- Assemble the brain:
- Pour the strawberry cheesecake filling into your prepared mold over that chilled crust, smooth the top with an offset spatula, then refrigerate for at least five hours until it's completely firm to the touch
- Create the brain squiggles:
- Melt the white chocolate in short bursts in the microwave, stirring between each one, then stir in a tiny amount of pink gel coloring until it reaches that slightly unsettling fleshy pink tone
- Pipe the brain texture:
- Pour the colored chocolate into a piping bag fitted with a small round tip, then pipe irregular squiggly lines onto a parchment lined baking sheet—these should look like brain folds, so embrace the chaos and vary the thickness
- Final assembly:
- Once the chocolate squiggles have completely set, carefully unmold your cheesecake and arrange those chocolate folds across the surface, then drizzle with extra strawberry coulis for that final disturbing detail
 Save
Save Last year I made this for my sister's medical school graduation party. Her neurosurgeon mentor took one look at it, laughed for a solid minute, and then asked for the recipe. Now it's become a weird tradition at every hospital function—they all claim it's the most realistic dessert they've ever seen.
Working With Gelatin
I used to skip the blooming step and wonder why my desserts never set properly. Then I learned that sprinkling gelatin over cold liquid and letting it absorb for five minutes makes all the difference. The mixture transforms from grainy to smooth, and it dissolves completely without any clumping. This one technique completely changed the texture of my no bake desserts.
Choosing Your Brain Mold
Not all silicone molds are created equal. The cheaper ones tend to be too flexible, which makes unmolding nearly impossible without damaging the shape. I've found that molds with slightly thicker walls and a bit of rigidity work best. If you're using a regular bowl instead, line it with plastic wrap that's been lightly oiled—the overhang becomes your handle for lifting.
Making It Ahead
This dessert actually tastes better after sitting overnight, which makes it perfect for parties. The strawberry flavor deepens and the texture becomes even creamier. I've made it up to two days in advance, keeping it tightly wrapped in the mold until I'm ready to decorate and serve.
- The chocolate squiggles can be made three days ahead and stored between sheets of parchment in an airtight container
- If you're transporting this to a party, do all the decorating at your destination since the chocolate folds are fragile
- Leftovers keep surprisingly well for three days in the refrigerator, though the brain texture starts to soften slightly after day two
 Save
Save There's something deeply satisfying about serving a dessert that makes people laugh before they even take a bite. This brain cheesecake has become my go to for any occasion that calls for conversation and good food in equal measure.
Recipe FAQs
- → Can I make this brain cheesecake ahead of time?
-
Absolutely. This dessert actually improves when made ahead, requiring at least 5 hours of chilling time to set properly. You can prepare it up to 2 days in advance and keep it refrigerated. Add the chocolate brain decoration and coulis shortly before serving for the freshest appearance.
- → What if I don't have a brain-shaped mold?
-
A brain-shaped silicone mold works best, but you can use a medium oval bowl lined with plastic wrap as an alternative. The shape won't be quite as anatomically detailed, but the oval form still suggests a brain outline when decorated with the squiggly white chocolate lines.
- → Can I use frozen strawberries instead of fresh?
-
Frozen strawberries work perfectly for the puree layer. Thaw them completely before blending, and expect slightly more liquid content. You may need to reduce the added water slightly to maintain the right consistency for the gelatin mixture.
- → How do I store leftovers?
-
Store any remaining portions in an airtight container in the refrigerator for up to 4 days. The texture holds up well, though the white chocolate decoration may soften slightly. For best results, keep the cheesecake chilled until serving time.
- → Can I make this without gelatin for a vegetarian version?
-
Yes, replace the gelatin with agar-agar, a plant-based gelling agent. Use approximately 1.5 teaspoons of agar-agar powder for every 2 teaspoons of gelatin called for in the recipe. Note that agar-agar sets more firmly and quickly, so work promptly when combining with the strawberry puree.
- → What's the easiest way to create the brain decoration?
-
Melt white chocolate and tint it pink if desired, then transfer to a piping bag fitted with a small round tip. Pipe squiggly lines onto parchment paper in various brain-like patterns, chill until firm, then carefully peel off and arrange on your chilled cheesecake. The squiggles don't need to be perfect—irregular, organic shapes look most realistic.